How to Restore my Dell Laptop to Factory Settings
Summary:
When meeting the problem that system becomes slow down or is attacked by viruses, users may reinstall system to regain a clear Windows environment. Now let’s talk about how to restore Dell laptop to factory settings.
Way 1: Reset Dell laptop using Dell Factory Image Restore – example for Windows 7
Way 2: Reset Dell laptop using Dell Backup and Recovery – example for Windows 8

Caution:
Factory reset will remove all files and programs. If you don’t back up your files, you will lose all personal files, including photos, E-mails and programs.
Way 1: Reset Dell laptop using Dell Factory Image Restore – example for Windows 7
In this way, you should make sure that you haven’t reinstalled other operating system for laptop, or no disk has been destroyed.
Note: This process only sets the C: drive back to factory settings and the other partitions will not change.
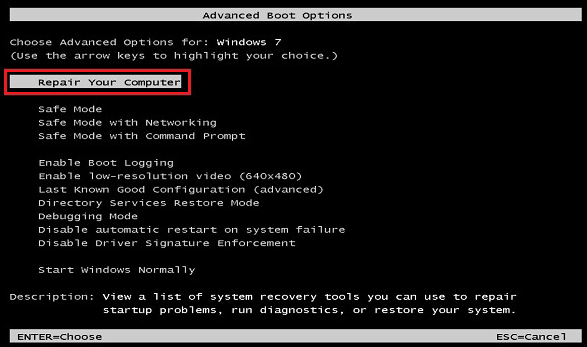
Step 1: Restart your laptop. When the Dell logo appears on the screen, press F8 to access the Advanced Boot Options menu.
Step 2: Use the Arrow keys to select Repair Your Computer and then press Enter.

Step 3: On the System Recovery Options screen, select a keyboard layout and click Next.
Step 4: On the next screen, you can log in as a local user or the Administrator. If you have not set up a password, click OK.
Step 5: Depending on your configuration, you may need to select Dell Factory Tools and then choose Dell Factory Image Restore.
Step 6: Click Next to open the Confirm Data Delete menu.
Step 7: Select Yes, reformat hard drive and restore system software to factory condition check box and click Next.
Step 8: After the recovery process completed, click Finish to reboot laptop.
Tips: During the process of laptop factory reset, laptop has to be connected with adapter.
Way 2: Reset Dell laptop using Dell Backup and Recovery – example for Windows 8
To factory reset your Dell laptop, you can also use software if you still could access your Windows.
Step 1: If there isn’t the software in your laptop, please go to My Dell Downloads website to register and download the Dell Backup and Recovery. And then install it.
Tips: You’d better create backup media for future use, because there is a limit to the number of times particular software can be downloaded and this would be indicated once logged into My Dell Downloads.
Step 2: Click the Settings Charm.

Step 3: Click the Power button, hold down the Shift key and click Restart.
Step 4: The system restarts, login and click Troubleshoot.
Step 5: Click the Dell Backup and Recovery icon.

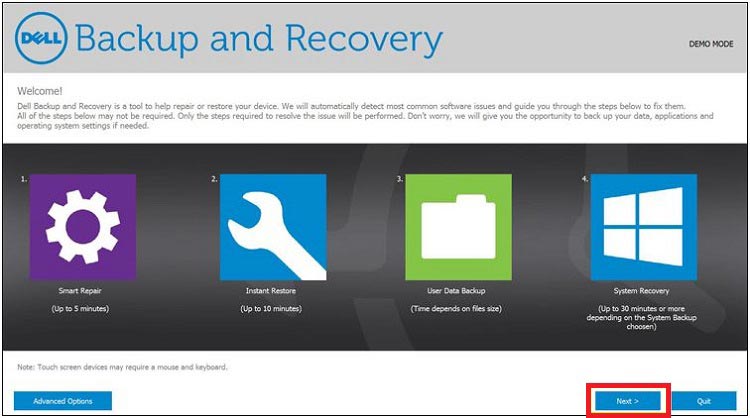
Step 6: After system restarts, you will see the Dell Backup and Recovery screen and then click Next.
Step 7: Drive Diagnostics are run to check if the driver is OK, and then click Next when it is complete.
Step 8: You will be prompted to back up your data, if you need to do so, click Next. If not, click Skip to go on.
Step 9: At this time, system may need a little time to recover the operating system. When it ended, click Restart.
Tips: Now you can restore any data or programs you want from backup files.


